Labels
- Alikas Scraps
- All Dolled Up Store
- Amy Marie
- Annaica
- Arthur Crowe
- Babycakes Scraps
- Barbara Jensen
- Bibi's Collections
- Black Widow Creationz
- Blu Moon
- Bonnies Creations
- Bookwork Dezines
- Broken Sky Dezine
- Carita Creationz
- Carpe Diem Designs
- CDO
- Celinart Pinup
- Celine
- Chacha Creationz
- Charmed Designs
- Cherry Blossom Designs
- Chili Designz
- Cluster Frame
- Creative Misfits
- Creative Scraps by Crys
- Curious Creative Dreams
- Danny Lee
- Derzi
- Designs by Ali
- Designs by Joan
- Designs By Norella
- Designs by Vi
- Diana Gali
- Diry Art Designs
- Disturbed Scraps
- Dreaming With Bella
- Eclipse Creations
- Elegancefly
- Extras
- Fabulous Designz
- Forum Set
- Foxy's Designz
- Freek's Creation
- FTU
- FwTags
- Gothic Inspirations
- Gothic Raven Designs
- Graphfreaks
- Hania's Designs
- Happy Pumpkin Studios
- Horseplay's Pasture Designs
- indie-Zine
- Irish Princess Designs
- Ishika Chowdhury
- Kaci McVay
- Kajenna
- katharine
- Katherine
- Khloe Zoey
- Killer Kitty
- Kissing Kate
- KiwiFirestorm
- Kizzed by Kelz
- KZ Designz
- Lady Mishka
- Lil Mz Brainstorm
- Maiden of Darkness
- Mariel Designs
- MellieBeans
- Misticheskya
- MistyLynn's Creations
- MMeliCrea Designz
- Moon Vixen Designs
- NaSionainne
- Ninaste
- Niqui Designs
- Pandora
- Picsfordesign
- Pink Paradox Productions
- Radyga Designs
- Redefined Designs
- Rissa's Designs
- Schnegge
- ScottishButterfly Creations
- Scrappin Krazy Designs
- Scrappin With Lil Ol Me
- Scraps and the City
- Scraps Dimensions
- Scraps From The Heart
- Scraps N Company
- Scraps with Attitude
- Shining Star Art
- Skyscraps
- Sleek N Sassy Designs
- Sophisticat Simone
- Souldesigner
- Soxsational Scraps
- Spazz
- Starlite and Soul
- Tammy Welt
- Tasha's Playground
- The PSP Project
- Thrifty Scraps by Gina
- Tiny Turtle Designs
- Upyourart
- Verymany
- Wendy Gerber
- Whisper In the Wind
- Wick3d Creationz
- Wicked Diabla
- Yude's Kreationz
Blog Archive
-
▼
2012
(119)
-
▼
September
(27)
- DARK ELIZABETH
- AUTUMN PLEASURES
- SEASON OF FROST
- SAMHAIN NIGHTS
- WITCHES BREW
- NAUGHTY SPACEGIRL EXTRA'S
- TOIL AND TROUBLE
- FORUM SET SHOWOFF
- EMO WITCH
- NIGHTLIFE EXTRA'S
- PUMPKIN MOON
- HALLOWEEN KITTY
- CITY AT NIGHT
- HARDCORE EXTRA'S
- TOUCHED BY AN ANGEL
- WITCHY WOMAN
- TRICK OR TREAT
- HOT STUFF
- TOO CUTE TO SPOOK
- BOO-TACULAR!
- EMO CAROUSEL
- DARK OBSESSION
- OH SO GLAM
- AUTUMN ROMANCE
- EMO ROCKER
- DARK DREAMER
- AUTUMN BUTTERFLY
-
▼
September
(27)
Thursday, September 13, 2012
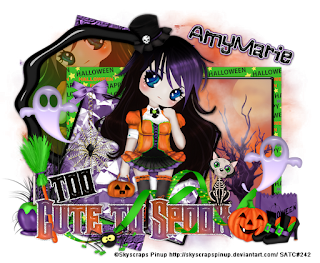
TOO CUTE TO SPOOK
Supplies needed:
I am using the adorable art from Skyscraps Pinup for this tutorial, which you can find here
Scrapkit: I am using an exclusive kit from Amy Marie called "Halloween 4 Marie" which you can only here or here
Halloween Temp 1 from Tamie which can be found here
Gems Mask 21 here
Plugins used: Eyecandy 4000 - Glass, Xero-Radiance, Xero-Bad Dream, Lokas 3D Shadow
----------------------------
This tutorial is written for those who have working knowledge of PSPX2 (any version will do).
This tutorial was written by me on September 13, 2012. Please do not copy or paste on any other forum, website or blog provide link back to tut only. Please do not claim as your own. This tutorial is copyrighted to me. Any resemblance to any other tutorial is purely coincidental.
Ok - let's start and remember to save often.
Open the template and using your shortcut keys on your keyboard (SHIFT+D) duplicate the template as a new image. Close the original and delete the copywrite layer.
Select Raster 8 "Too" Wordart
Apply Eyecandy - Glass at default settings
Select Raster 9 Wordart white back
Adjust, Add/Remove Noise, Add Noise (Uniform checked, Noise 100%, Monochrome checked)
Select Raster 6 Wordart layer
Select all, float, defloat
Add new raster layer and flood-fill with gradient of choice (Linear style, Angle 45, Repeat 6)
Delete/Hide original wordart layer
Select Raster 7 Wordart white back layer
Adjust, Add/Remove Noise, Add Noise (Uniform checked, Noise 100%, Monochrome checked)
Select Ghosts Raster 12 layer
Apply Eyecandy - Glass with same default settings
Select Square Raster 10 Frame layer
Select all, float, and defloat
Add new raster layer and flood fill with color of choice
Apply Eyecandy - Glass with same default setting as above
Delete/Hide original frame layer
Select Square Raster 1 layer
Select all, float, defloat
Paste Paper pp6
Select invert, delete, select none
Delete/Hide original square layer
Select Square Frame Raster 11 layer
Select all, float, defloat
Add new raster layer and flood-fill with color of choice
Select none
Again apply Eyecandy - Glass at default settings
Delete/Hide original frame layer
Select Square Raster 3 layer
Select all, float, defloat
Add new raster layer and flood-fill with gradient of choice (Linear style, Angle 45, Repeat 2)
Select none
Delete/Hide original square layer
Select trees element from kit - resize by 35%
Paste and reposition on top of gradient square layer under frame
Now you can either erase the little bits hanging over OR go back to your gradient layer
Select all, float, defloat
Select your element layer again
Select invert, delete, select none
Select your Fog element - resize by 80%
Paste and reposition over your tree layer under frame
Select Square Raster 21 layer
Select all, float, defloat
Paste paper pp3
Select invert, delete, select none
Delete/Hide original square layer
Select Circle Raster 5 layer
Select all, float, defloat
Add new raster layer and flood-fill with gradient of choice (Linear style, Angle 45, Repeat 2)
Paste and reposition close-up tube of choice on top of gradient and delete
Change closeup to Hard Light
Apply Xero Bad Dream at default settings
Drop the opacity on close-ups down to about 60%
Apply dropshadow and merge down on top of paper
Apply Effect, Texture Effects, Blinds (Width 2, Opactity 15, Horizontal and Light from left/top checked)
Hide/Delete original circle layer
Select Frame2 element from kit - resize by 60%
Paste and reposition on top of circle layer
Select Rectangle Raster 4 layer
Select all, float, defloat
Add new raster layer and flood-fill with color of choice
Select none
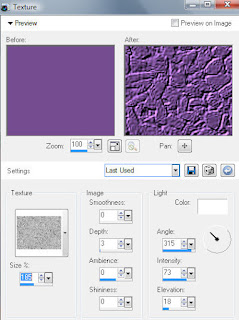
Effects, Texture Effect, Small Stone Texture with the following settings:
Delete/Hide original rectangle layer
Copy and paste tube of choice and position where desired
Apply Xero Radiance at setting of choice
Apply Lokas 3D Shadow
Select New raster layer and flood fill with color or gradient of choice
Move layer to the bottom of the template
Apply mask 21
Merge group and move to the bottom
Add any additional elements you like.
Add any dropshadows you like
Crop and resize as desired
Add copyright info, license number and name
You're done! Thanks for trying my tutorial!
Labels:Amy Marie,Scraps and the City
Subscribe to:
Post Comments
(Atom)


0 comments:
Post a Comment